Wednesday, February 28, 2007

Progressive scrapbook page swap...


Now, I'm not one normally who signs up for swaps. I just don't ever seem to have the time for them so I stick to just the mini catalog swaps that my upline Jan hosts. Anyhow because of this, I have basically zero Stampin' Up scrapbook samples. I have a couple of hostess clubs going whose members are real scrappers, so I decided I better get some samples... I found a swap that is being hosted on the demo only side of splitcoaststampers, so I decided to join. The swap is pretty easy...all you need is six 12x12 progressive scrapbook pages.

A progressive scrapbook page is one that starts out as a 6x6 page, is then turned into a 8 1/2x11 page and finally into a 12x12 page. This is a really nice way to teach scrapbooking to newbies who are easily overwhelmed.

So...here is the first part of my swap, the 6x6 portion. Hopefully tomorrow I will get it turned into at least the 8 1/2x11 page and possibly complete it, so don't forget to check back.

The 6x6 piece is Barely Banana cardstock that I stamped with the Canvas background stamp. Then I took a strip of Certainly Celery cardstock and stamped it with the Crosshatch background stamp. Around this I tied some pieces of French Blue grosgrain and white wide organdy ribbon, tying them through a piece of antique brass Hodgepodge Hardware.

Next I adhered this onto the page base, and then went to work on the finishing touches. The two right corners are embellished with some photo corners that I made out of a scrap of Sarah designer series paper. Then I added an antique brass brad to each. To finish off the page I decided it needed a photo mat, so I took a 4 1/2 inch square piece of Brocade Blue cardstock and stamped it with the Paisley Print background stamp. (Can you tell I love bg stamps??? lol) I then punched the corners of it with my Ticket Corner punch and adhered it onto the center of the page. Below is a picture of the page without the photo of my adorable Jaden-baby so that you can see what it looks like empty. (You can also tell I forgot my OTT light with this photo, lol)


I really like this method to scrapbooking, and am really looking forward to finishing up these swaps. Check back tomorrow for the finished piece!

Pretty Paisley

Well, since SU! is offering such a great special with the Polka Dots & Paisley stamp set, I decided to break it out and make some samples. (If you don't know, for the entire month of March, if you purchase the Polka Dots & Paisley stamp set, the Petals & Paisley double sided designer paper, and the Petals jumbo wheel for a combined total of $34.85 you can purchase ANYTHING else in the Spring Mini for HALF price!! WHoo hooo...this even includes the Simply Sent card kits, WOWZA!

The base of this card is Tempting Turquoise cardstock stamped with the Floral background stamp. I then mounted a piece of the Petals designer paper to it, and tied a piece of white wide organdy and spring moss grosgrain ribbon around the side. I took a piece of Antique Copper hodgepodge hardware and tied the ribbons through it. The little tag was cut out with my Cuttlebug and then I used my stampamajig to line up the "joy." I tied this on with a small piece of copper cord.

The main image was stamped on a piece of Whisper White cardstock (the stamp was colored in with Stampin' Write markers). I punched the corners of this with my ticket corner punch. Then it was mounted on a piece of Old Olive cardstock that's corners were also punched. The piece felt a little small to me for the card, so I mounted it on a large piece of Certainly Celery cardstock that I sponged the edges of. For a finishing touch I added some Antique Copper brads to the corners.

Tuesday, February 27, 2007

Chipboard brag book


My stamp club made these last week...isn't it cute? The book itself is made from four 4x4 chipboard coasters that I got from Starlit Studio. We covered them in Cardstock and then used the SAB set "Delight in Life" and the matching SAB Simply Scrappin' Kit to embellish them. The cover is Regal Rose cardstock stamped with the same color ink and the large flower image. I used one of the ribbon looking cardstock strips in the SS kit to embellish the front, along with a flower that I stamped and cut out. The title, "Spring Boy" (totally cheeeezy I know) was stamped in Basic Black ink with the "Whimsical lower alpha." To attach the insides I punched holes in all of the coasters with my Cropadile and then tied them with bows made from some Apricot grosgrain ribbon. (if you do this yourself, make sure you don't tie the sides too tightly or you won't be able to turn the pages very easily)

The next two pages were covered with Certainly Celery cardstock and stamped with the polka dot stamp from this set. I then added some striped designer paper from the SS kit and a couple of other embellishments, like the little photo corners. (I love these pics of Jaden...he was about 20 months old and thought that mud and the hose were just the greatest inventions in the world, lol)

These two pages were covered in Bashful Blue cardstock and stamped with the small bloom stamp from the "Delight in Life" set. A little more patterned paper and a few flower adhesive die cuts finished off these pages. (These pics were taken at a friend's house when Jaden was almost 2. The one in the tree is prob one of my top 3 favorite pictures of him. The pure wonder in his eyes is just beautiful, doncha think?)

The last two pages were covered with So Saffron cardstock and stamped with the little swirly thingy stamp. I used a few of the adhesive die cuts and adhered the tab on onto the photo with a Certainly Celery brad. I used my small corner rounder to round these pictures, and then stamped the "so silly" using Basic Black ink and my "Whimsical lower" alphabet stamps. (My Absolute favorite alphabet set! I think it looks just like rub-ons) Isn't the pic on the left funny? I miss that silly expression... **insert sad mommy face, lol***

Well...that's it for tonight. I hope you guys forgive me for my lack of posts the last couple of weeks...I promise to get back to the everyday posting, I know how much I hate it when my favorite blogs don't update for a few days. Thanks for checking back with me though!!

Target dollar spot find


I found this adorable little bucket a couple of days ago in the dollar spot at Target. Too cute!! It had some pretty pink ribbon tied through the holes, but in order to make it all SU! I went ahead and took them out and tied some black grosgrain ribbon through them.

I stamped the bucket with black stazon and the little bloom flower from the "Polka dots and Paisley" stamp set. You have to do this really carefully because of the shape of the bucket. If you're not careful you can smear your image pretty easily.

For the stamped image, I took the flower from the same stamp set and colored it with my Stampin' Write markers and stamped it on Shimmery White cardstock. I cut this out with my colluzzle and mounted it on a scalloped circle that was punched out of the new Petals and Paisley designer paper with my Marvy giga scalloped punch. I took my white gel pen and added some dots to the scallops as well.

That's it! Maybe I will use this little bucket as a door prize for my next club meeting...hmmmm. Oh yeah, do you like my new pictures? I got a new OTT light and am loving it...makes the pictures look like they are straight from the SU! catty...tee hee hee

I'm feeling guilty here...


About not posting all week...I'm very sorry. I have had a WICKED sinus infection, plus school and everything else, I just haven't gotten anything stamped. **insert sad face**

Last Friday I took Jaden to see the La Fiesta de los Vaqueros Rodeo...it was alot of fun. He didn't sit well through the whole thing, but we still had a blast. This is a pic of him on a fake bull...I thought it was pretty funny. he he

Stay tuned for gobs of stamped stuff as I try to make up for my seriously lacking blog over the past couple of weeks.

Thursday, February 22, 2007

Martini anyone?


Ok, isn't he just the cutest? I'm not sure if I like the card as a whole, but I am living this stamp.

The image is stamped on Whisper White in Basic Black ink. Then I colored it in with my Stampin' Write markers and cut him out with my Colluzzle. I mounted him on a Old Olive scalloped circle and used my White Signo gel pen to dot around the edges.

The card base is Almost Amethyst stamped with the Print Pattern BG. Then I stamped a piece of Certainly Celery with the French Script BG in Old Olive classic ink. I tied a piece of white grosgrain, and adhered all the pieces together.

I'm not quite happy with it, so I guess I'm forced to stamp some more...**wink**

Wednesday, February 21, 2007

The Eyes have it!

I restrained myself and only bought 2 stamps this weekend at the rubber stamp expo. This is one of them. Isn't that the cutest stamp? OMG I just love them!! The stamp is actually called "Eyes" and at the moment I can't remember who makes it, but I love em!! I have another adorable stamp to use and post tomorrow too!!


The image was stamped in Basic Black on Whisper White cardstock. Then I colored them in with my Prismacolor Pencils, blending them with gamsol and a stump. Then I took my two way glue pen and Dazzling Diamonds glitter to glitz up the little guys' eyelids, noses and eye...um...stems (for lack of a better word).

The card base is Green Galore, and on this I added a small piece of Only Orange cardstock stamped with the "On the Spot" background. To finish up the card I stamped the "Dotted" bg on a piece of Tempting Turquoise cardstock and mounted the image onto it. I added a piece of Hodgepodge Hardware with a Tempting Turquoise brad to the left side. Then I tied a piece of orange grosgrain ribbon to it!

Hope you like it, I'm totally loving this stamp!! More cards to come now that I'm done with the billion swaps!!

Thanks for stickin' with me!

Wanna see why I haven't been around all week?


These crazy swap cards!! Next time I decide to make 2 sets of 44 cards for a swap, and then decide to make them so involved, I hope someone smacks me. After stamping and coloring in 44 of each of the cakes and little presents, xacto knifing the claws, inserting the little cut out pieces, glittering, spritzing,stamping, cutting, blah blah blah...I think I am so over this set lol!

Anyhow, the card was originally going to be this card, but in the essence of time (bwahahahaha) I cut out a layer on the bg of the crab and turned the cranberry layer to the side.

Phew! I'm so glad these are done and on their way tomorrow. Now I get to play with the goodies I picked up at the rubber stamp expo this past weekend!!

Friday, February 16, 2007

One layer card


So I have been seeing all of these great one layer cards. I have always loved them but never actually made one. The thought of a card with no layers just kind of freaks me out. Anyhow I tried it today...here's the results.

This card is Whisper White with the sentiment "Thanks" stamped on it from the new "Doodle Alphabet" in Black Stazon. I colored the letters in with Green Galore and Tempting Turquoise Stampin' Write markers. To finish off the card I tied some of my new ribbon around the side, and VOILA!! My first one layer card. What do you think???

Thursday, February 15, 2007

Happy Birthday to me....


hehe.. ever notice that the older you get the more you get to buy your own birthday presents? lol.. Anyhow, I ordered myself a little birthday present on Tuesday and it actually showed up today! Talk about great timing. I got the new "Doodle Alphabet" and the "Petals and Paisley" designer paper from the new Spring mini. Then I happened by Michaels and got myself a BUNCH of the adorable Dashes, Dots, and Checks ribbon!

Pretty great birthday present if I do say so myself! (couldn't be bad since I picked it all out, haha)

Wednesday, February 14, 2007

Happy V day!

Sorry I haven't gotten anything posted this week. Time has just gotten away from me, and I haven't had any stampin' mojo. Anyhow, here are a couple 'o cards for today.

This guy was so fun to make. Slightly time consuming, but fun none-the-less. I stamped the crab from the new spring set "Crab & Company" on Whisper White cardstock with Black Stazon. Then I used reinkers and a paint brush to color him in. The colors of this card are from this week's SCS color challenge CC101, they are Cranberry Crisp, So Saffron, and Certainly Celery.

After he was colored in, I took my craft knife and cut around the edges of his claws. I then stamped the gift and the cake on white, cut them out and slid them through the slits in the claws. To hold them in I used some scotch tape on the backside. I colored the sand with a So Saffron marker and then used a 2-way glue pen and some Dazzling Diamonds glitter to shine up the sand.

I mounted this on a piece of Cranberry cardstock and then on a piece of Celery cs, tearing the edges. The card base is So Saffron with the bottom of the card being stamped with the little starfish and spritzed with my color spritzer tool and So Saffron ink. I mounted a piece of Cranberry cardstock that was stamped with the "Dotted" bg on the card base and then mounted the crab on top. I tied a piece of celery grosgrain ribbon around the left side and then stamped the sentiment on the bottom in Black ink.


This card was for this week's sketch challenge on SCS. I'm not especially fond of this sketch, it's a little hard to embellish lol!

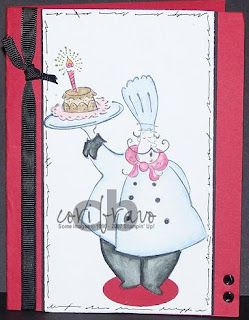
The chef from "Voila" was stamped on Whisper White cardstock in Black Stazon and then colored in with Prismacolor pencils and gamsol. To ground him in the cardstock I stamped his feet on a red oval that I punched with my small oval punch and then cut out the feet and adhered it around them.

Then I used my black Stampin' Write marker to doodle a frame around the edge of the cardstock. This was then very slightly mounted on a piece of Basic Black cardstock and mounted to the Real Red base. To finish up the card I set two black eyelets and tied a little bow on the left side with some black grosgrain ribbon.

I'm not especially fond of this card, but I don't hate it either, lol...So do you think I should do the crab one for my other swap or is it too much work for 44 cards?

Saturday, February 10, 2007

Meet Richie Rich


Yup, Jaden has a new pet with another weird name. This is "Richie Rich" and he arrived today. Richie is a 15 year old Quarter horse who loves kids. And so far the feeling is quite mutual. Jaden was a little nervous at first, in fact he told me "I'll try him out, and if I don't fall off he can stay." LMAO how funny is that. Needless to say, Jaden didn't fall and Richie Rich is still here.

No laughing at Jaden's pink fuzzy socks and 4th of July boxers either, ha ha.

Hopefully I'll be back soon with another card.

Supplies for my swap

One of my 6 blog readers *heehee* asked how much of the designer paper it took to make the swaps. I actually only bought one package of the paper (cuz it's a pre-order.) Luckily there were 2 designs in the package that were yellow and looked almost alike, so I had 4 sheets of basically the same paper. I cut the long strip to 5 1/2x 2 1/2 inches so I got 16 strips out of each piece of 12x12 paper. I used just about 3 sheets of it I think.

I also used 10 sheets of Cool Caribbean, about 3-4 sheets of the Chocolate Chip and about 3-4 Whisper White, and half a sheet of the striped designer paper. I hope that this helps you a little if you are planning on a monster swap, *wink*.

I still have one more swap card to make..so keep checking for the next monster, lol!

Friday, February 9, 2007

Wowza Batman!


Ok, so here is the rundown on my 40 swap cards, lol

120 pieces of cardstock cut
80 pieces of Notations designer paper cut
80 word window punches punched
120 images stamped
80 holes punched
80 eyelets set
160 edges distressed
320 corners punched
total supplies used about 8 bucks

40 great swaps in return...Priceless

Thursday, February 8, 2007

Office Swap Card decision


So I finally decided on a card for my Spring mini Office Accoutrement swap. What do you think about this baby?

The cardbase is Cool Caribbean stamped with the Paisley Print BG stamp. Then I followed the SCS sketch challenge 110. The designer paper is from the new Notations set, which I love!! Then I used my word window punch to do the small chocolate chip strips. I set each of these with a white eyelet.

The main image is stamped in Cool Caribbean ink on Whisper White cardstock, and then I used my stamp-a-ma-jig to line up and stamp the "original" sentiment in the center with Chocolate Chip ink. I inked the edges with Chocolate Chip ink, punched the corners with the Ticket corner punch, and then mounted it on a piece of Chocolate Chip cardstock that was also corner punched.

TONS of work, but I definitely think they are worth the effort...

Wednesday, February 7, 2007

Shrimp Soup


Ok, can you tell that I'm trying really hard to make up for the fact I didn't post everyday this week? LOL this is card 4 for the day1

The colors again are Chocolate Chip, Cool Caribbean, Whisper White, and Blush Blossom. The card base was stamped with the "Linen" BG stamp. Then I took the "On the Spot" Bg and inked it up in Cool Caribbean. I went back after it was inked and added the Chocolate Chip with a Stampin' Write marker. I tied a piece of chocolate grosgrain around this and mounted it to the card base.

The main image was stamped on Whisper White. I inked the edges of the coffee cup from "Like it a Latte" in Chocolate Chip with a marker and stamped it on the cardstock. Next I masked it off and stamped the little shrimp "inside" the cup in Black Stazon. They were both colored in with ink refills and a watercolor brush.

Next I took the Stazon and added the steam above the cup, so that you can tell he's in "hot water" hehe. Last but not least I took my black Stampin' Write marker and doodled a frame around the edge.

Now to find a sentiment that fits...any suggestions??

How about some office sparkle?


So I'm trying to figure out what card to do for a swap...any input would be GREATLY appreciated!

The card base is Cool Caribbean cardstock with the large flower from the "Office Accoutrement" stamp set stamped in Versamark. Then I inked up the "Linen" background in Cool Caribbean ink and stamped it over the top.

The memo stamp is on Whisper White cs that has had the edges sponged with Chocolate Chip ink. Then I used my stamp-a-ma-jig to line up and stamp the sentiment from "Warmest Regards" in Chocolate Chip ink. I mounted this on a piece of CC cardstock and then used the new round tab punch and added the little tab on the left side. I added a white eyelet to the tab for a little something extra. **wink wink**

The little piece of notebook looking paper is actually a small piece of the new Notations double sided paper that was punched with the new spiral punch. I mounted this on the cardbase and then mounted the memo piece on top.

The flower was stamped on Cool Caribbean ink on the same cardstock and then cut out with my paper snips. I took my 2-way glue pen and went around the edges of the flower and then sprinkled on some Dazzling Diamonds glitter (now I'm thinking maybe some faux stitching might have been nice...hmmmm)

I punched two small holes in the center of the flower and tied a bit of chocolate grosgrain through. Mounted this over the top of the rest and that was it. Thanks for checking in!!

Snappy Birthday...


This card is based on this week's sketch challenge on SCS. I was a little put off my all the layers at first, but am really loving how it turned out.

The card base is Certainly Celery cardstock stamped with the "Paisley Print" bg stamp. Then I cut the smaller pieces from different sheets of "Sarah" designer papers.

The little clam was stamped on a 2 1/2 inch square of Whisper White cardstock in Black Stazon. I then used my Stampin' Write markers (celery, bashful, and banana) to color him in. I used my stamp-a-ma-jig to line up the hat and the sentiment as well.

I used a direct to paper technique around the image, punched the corners with my ticket corner punch, and then mounted it on a piece of "Sarah" designer paper. After punching the corners of this as well, i went ahead and mounted this onto the card base, added some soft subtles and rich regals brads, and that's it!

Thanks for lookin'!

Birthday Memo


I made this card for this week's color challenge on SCS. The colors are Cool Caribbean, Chocolate Chip, and Blush Blossom. I also used a little Whisper White to stamp the image on.

The card base was stamped with my new "Dotted" bg stamp, and then tied a strip of chocolate ribbon from the Flirty orgionals around the Blush strip and then mounted the strip on the card base.

The large flower was inked in Cool Caribbean ink and then the edges were colored with a Chocolate Chip Stampin' Write marker. I stamped this on a piece of whisper White cs and then cut it out with my Paper Snips. The center of the flower is a small clear button. I stamped the "Canvas" bg stamp on a small piece of cool Caribbean , used a drop or two of Crystal Effects to glue the button down, and then trimmed around it. In the center, I tied a small piece of Linen thread.

The memo stamp was stamped on WW in Cool Caribbean ink and then I used the small flower to randomly stamp around this in Blush Blossom ink. I sponged the edges with some chocolate ink, mounted it on a piece of Chocolate Chip cardstock, and then onto the card base.

I'm feeling like something is missing, but not quite sure yet...what do you think?

Tuesday, February 6, 2007

Spring Goodies


I ordered a bunch of goodies from the Spring mini and some other stuff from the current catty. And...actually paid express shipping so that I could get it before the weekend. Guess what showed up TODAY??!!?!?! Yup, super delayed!! Grrr, oh well, at least they are refunding my express shipping, lol.

I have a super ugly sinus infection and my urge to stamp is about nothing, so I figured I'd post a pic of what I got, and hopefully some great cards tomorrow.

Office Accoutrement Stamp Set
Crab & Company Stamp Set
On the Spot BG Stamp
Dotted BG Stamp
Flannel Plaid BG Stamp
Notations Double Sided Paper
Sarah Designer Series Paper
Whisper White cardstock
Chocolate Chip cardstock
Cool Caribbean cardstock
Ticket Corner Punch
Round Tab Punch
Spiral Punch
Springtime Stems Hostess set
AND 3 Sellabration sets!!

Whoo hooo...and I have my next order all ready to go, lol! Hopefully I'll be better tomorrow and get a bunch of stuff posted using my new goodies! Till then...

Saturday, February 3, 2007

Cased frame


I cased this frame from the SU! catty. I changed the colors and the actual stamp, but it is basically the same. I got the frame at Michaels for a buck and am loving how it turned out!

First I painted the frame with some Making Memories acrylic paint. Everything else was really easy. I stamped the caterpillar from "Cute as a Bug" on Shimmery White cardstock in Bashful Blue, Real Red, and Green Galore classic ink using my stamp-a-ma-jig to make sure they were lined up right. Then I used my ticket corner punch on the corner and mounted it on a piece of Real Red cardstock again punching the corners.

I tied some light blue and red gingham ribbon and a piece of apple green grosgrain around the side. I had to use a marker and my stamp-a-ma-jig to stamp the saying on the 1x1 square of cardstock. I cut off one of the hooks on the side of the hodgepodge piece, used glue dots to adhere the saying inside and tied it to the ribbon with a piece of hemp.

The bug strip was adhered using a bunch of mini glue dots, and then I used a few more to add the hodgepodge with the green galore brads to the sides.

Added the pic of my baby when he was still a baby, and Voila! Super cute quick wall art!!

Happy Saturday everyone!!

Friday, February 2, 2007

Bella Box


So these boxes are all the rage, and I finally got around to making one. The actual box is made with chipboard coasters that I bought from Starlit Studio. I cut some Spring Showers designer paper into 4x4 squares. Then I modgepodged them onto the coasters, using my brayer to be sure there were no bubbles.

Next I took my crop-a-dile and punched the holes on each side and tied them all together with some taupe grosgrain ribbon. For the front I decided to use a bella stamp. I stamped her in Black Stazon onto a piece of watercolor paper, and colored her in with a paintbrush and some ink refills (So Saffron, Bashful Blue, and Creamy Caramel). I then used my ticket corner punch to do the corners, and mounted her on a piece of Creamy Caramel cardstock, punching the corners of it as well.

Here is a pic of the inside of the box. I mounted it on the inside, about a half of an inch from the actual bottom of the side pieces. It is adhered with a hot glue gun. You could actually just fit it in the bottom without the glue if you were only going to put something light inside, like candy or tissues, etc.

I have a big plan for what to post tomorrow, so check back, and hey...thanks for checking out my blog and posting comments, I really appreciate it!

Thursday, February 1, 2007

So very hoppy!!


This is a really quick and simple card. I stamped the So Very sentiment the same way as yesterday's card substituting the frog for the pig. The froggie is colored in with a Certainly Celery Stampin' Write Marker. Then I stamped the "happy" underneath in Certainly Celery ink. This was all stamped on Shimmery White cardstock and then mounted on a piece of Chocolate Chip cardstock.

The cardbase is Certainly Celery stamped with the froggie all over in a random pattern to make a background. Then I tied a piece of white grosgrain around it and added a piece of celery grosgrain. I used my color spritzer tool and the Celery marker to spritz the card image, and took the Chocolate Chip ink pad and did a direct to paper rub around the cardbase.

I mounted the image on the cardbase and VOILA! Three minute quickie card!